Multimaster ROS configuration and multimaster_fkie
Multimaster ROS configuration and mutimaster_fkie
ROS version: Luna.
OS: Ubuntu 16.04.
multimaster_fkie: github, master, tag 0.8.2. (github repo)
1 Network configuration
1.1 Router
- Setup a wireless router and connect two computers/robots.
- Setup static IP addresses for those two computers.
- Test ping command and ssh mutually.
1.2 Hosts
Let’s define the computer 0 as the master computer C0, let computer 1 be the client computer C1.
On C0 and C1, backup their /etc/hosts files and modify these file to register their IP addresses.
NOTE: It would be a better idea that we just use the computer name as the hostname of C0 and C1. Here, the “computer name” is the name appears next to “127.0.1.1” in the /etc/hosts file. ROS and node_manager of multimaster_fkie treat different kinds “hostname” in different ways. Just do not try to “configure” them. You’d better double check if the content of /etc/hostname is consistent with the names in /etc/hosts.
A sample /etc/hosts file looks like the following one shown in figure 1. Now let’s use my own computer as C0 (hostname: yyhu-live). The client computer as C1 (hostname: ai-airlab).

Figure 1 Sample /etc/hosts file on C0. ↑
yyhu-live is my computer’s hostname. 127.0.0.1 and 192.168.5.101 are assigned an identical hostname.
Ping C0 and C1 using the newly defined hostnames from each side.
1.3 ROS network
This section is composed by mainly referring to this pdf. (“Multi-master ROS systems” by Sergi Hernandez Juan & Fernando Herrero Cotarelo)
On each computer put this line into their .bashrc file.
export ROS_MASTER_URI=http://yyhu-live:11311
To use ROS over SSH, on the Ubuntu 16 system, the user has to comment the following lines in their .bashrc file as shown in figure 2. (Reference here. The official website of multimaster_fkie also mentioned this issue.)
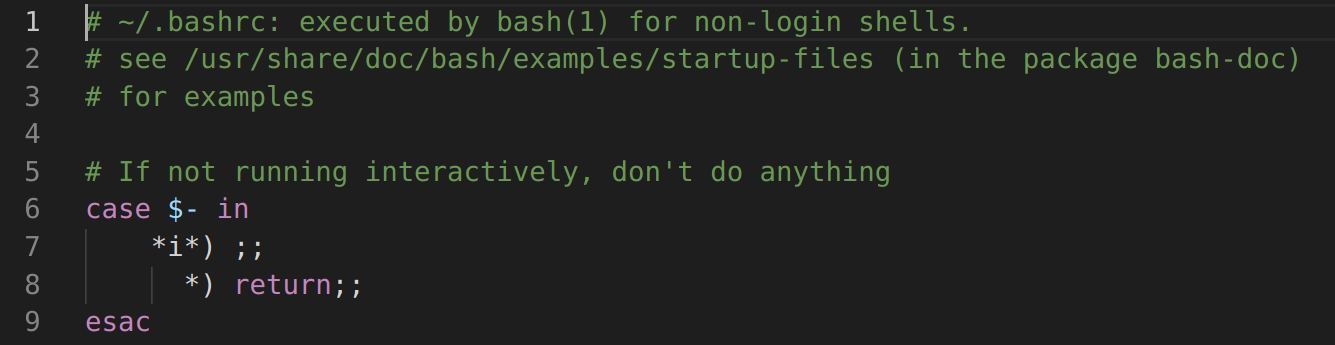
Figure 2 Lines to be commented in .bashrc file. (Line 6 to 9.) ↑
NOTE: Ignore the following table.
On the master computer, C0,
export ROS_HOSTNAME=<C0's hostname>

(C1 will try to get access to /roslaunch/uris/host_ros_c0__<pid>, if the hostname of C0 is not changed, C1 will experience an error such as "Temporary failure in name resolution". )

(The above solution faces another issue. The client computer C1 could see a topic published on C0, but could not get any data. This is only resolved by setting the computer name (the hostname of 127.0.1.1 on C1) as an alias of ROS_C0 in the /etc/hosts on C1.)

To summarize, ROS_MASTER_URI tells a node where to find the master. ROS_HOSTNAME tells a node what its IP address is.

Reference:
ROS official documentation.
ROS Answers.
Use the following command on every computer to check if the multicast function is enabled.
cat /proc/sys/net/ipv4/icmp_echo_ignore_broadcasts
Use the following command on every computer to enable the multicast function temporarily.
sudo sh -c "echo 0 > /proc/sys/net/ipv4/icmp_echo_ignore_broadcasts"
To permanently enable the multicast function, edit /etc/sysctl.conf file, add the following line.
net.ipv4.icmp_echo_ignore_broadcasts=0
And use the following command to restart the relevant service.
sudo service procps restart
Use this command to show the currently defined multicast groups. Normally, there should be a 224.0.0.1 group.
netstat -g
Use this command to see if all the computers respond to the broadcast.
ping 224.0.0.1
1.4 Test the usability of multimaster ROS network
On C0 start roscore, then start the master_discovery node. The terminal output is in figure 3.
rosrun master_discovery_fkie master_discovery _mcast_group:=224.0.0.1

Figure 3 Terminal output after starting master_discovery node on C0. ↑
On C1, WITHOUT starting a roscore, start the same node with a different node name. (Reference.)
rosrun master_discovery_fkie master_discovery _mcast_group:=224.0.0.1 __name:=master_discovery_ai
NOTE: There are TWO underscores before the name parameter.
If the node names are the same, C0 will complain about this situation and terminate itself.
On C0 start master_sync node (terminal output is shown in figure 4).
rosrun master_sync_fkie master_sync

Figure 4 Terminal output after starting master_sync node no C0. ↑
On C1 start master_sync node with a different node name.
rosrun master_sync_fkie master_sync __name:=master_sync_ai
At the moment, each master_sync node should print synchronization information. This information will be refreshed in an interval of several seconds.
List the current topics and node by “rostopic list” and “rosnode list” on each computer, one should see the same results. It is illustrated in figure 5.

Figure 5 List of topics and nodes. Executed on C0. ↑
If everything works, now let’s try to publish and subscribe real data. On any of the two computers, start an anonymous node using the following command.
rostopic pub -r 1 /test std_msgs/Int32 1
The above command will start an anonymous node and advertise a topic with the name “/test”. This node will publish an Int32 type value, 1, every second. Now use “rostopic list” and “rosnode list” to see if the new topic and node exist. The results will be similar to figure 6.

Figure 6 The new anonymous node. ↑
If /test is on C1, use
rostopic hz /test
on C0 to see if C0 could really receive any actual data. The results are in figure 7.

Figure 7 Frequency test on a ROS topic. ↑
2 node_manager GUI
Now we have configured a working multimaster ROS network, we could use node_manager GUI to visualize the information of the nodes in the ROS network and interact with those nodes.
2.1 Prepare a test ROS node
We will test some functionalities of node_manager, this needs a sample ROS node to work with.
A simple ROS node is created. This node will simply publish a string message every second. This node is written in Python and a launch file should be prepared. The associated ROS package is called “test_pub”, and the Python script is called “simple_pub.py”. The script and launch files could be found here.
Since node_manager heavily relies on the tool named “screen”, we have to install in on our system.
For now, any ROS node should be launched in a “screen”. node_manager assumes that a “screen” has a specific “name” which is associated with the “name” of the ROS node. We have to explicitly specify the “screen name” and the “ROS node name” when launching a ROS node in “screen”. Using the test_pub package as an example, we use the following command to launch its ROS node (a running roscore on C0 is required since we’ve configured the system-wide ROS_MASTER_URI).
screen -S _simple_pub_launch -dm roslaunch test_pub simple_pub.launch
where -S argument of “screen” specifies the name of the “screen” and -dm argument of “screen” tells “screen” to start in the detached mode an execute the command specified as the rest of the command line arguments. Note that there is a space character between the -S argument and the name of the “screen”. Once this command is issued, one could use
screen -ls
to see if the launch works well and the name of the “screen” is properly set.
Store this sample node on C1 for later use.
2.2 Test node_manager
Now stop any running nodes on C0 and C1, leaving the roscore on C0 running. On C0, start node_manager by
node_manager
As shown in figure 8, the GUI of node_manager will show up.

Figure 8 node_manager. ↑
At the moment, the “ROS Network” panel (left-top corner, #1 in figure 8) shows no enabled networks. This is because there are no master_discovery nodes running in the network. Under the “{SYSTEM}” leaf (#2 in figure 8), there are only other two ROS nodes running. We enable a network by clicking the “Start” button (#3 in figure 8) on the “ROS Network” panel. Then we will see the “Start discovery” dialog window, as illustrated in figure 9.
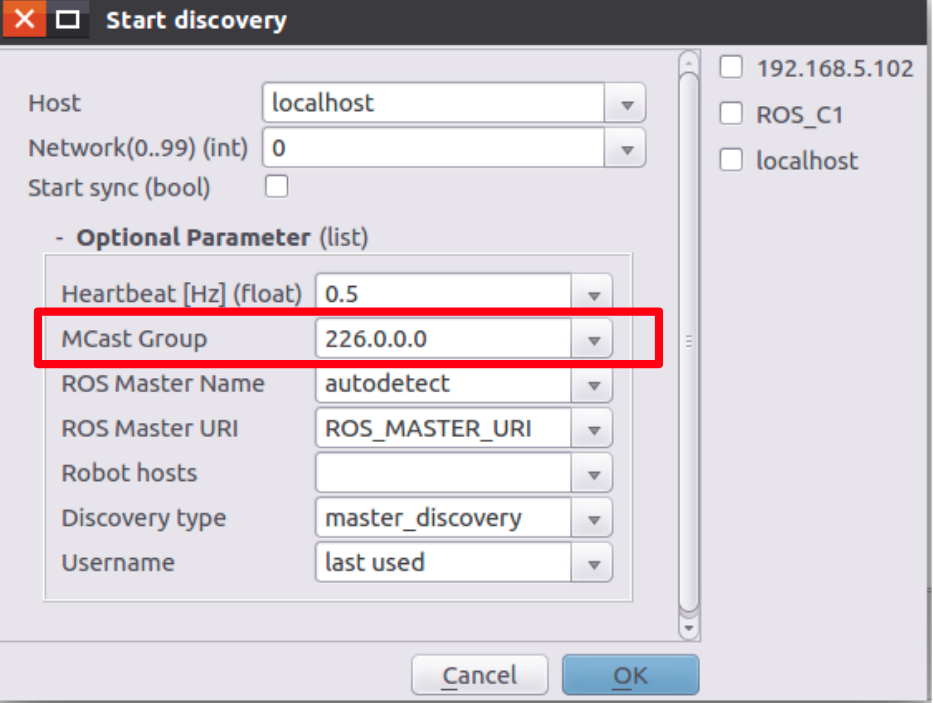
Figure 9 Start discovery dialog window. ↑
Leave everything as their default values except the “MCast Group” then click OK. A new master_discovery node (#1 in figure 10) will be shown under the {SYSTEM} leaf and a newly enabled ROS network, id:0, is shown in the “ROS Network” panel (#2 in figure 10). Figure 10 shows this view.

Figure 10 The master_discovery node started. ↑
Now we could use the button shown in figure 11 (#1) to start the master_sync node.
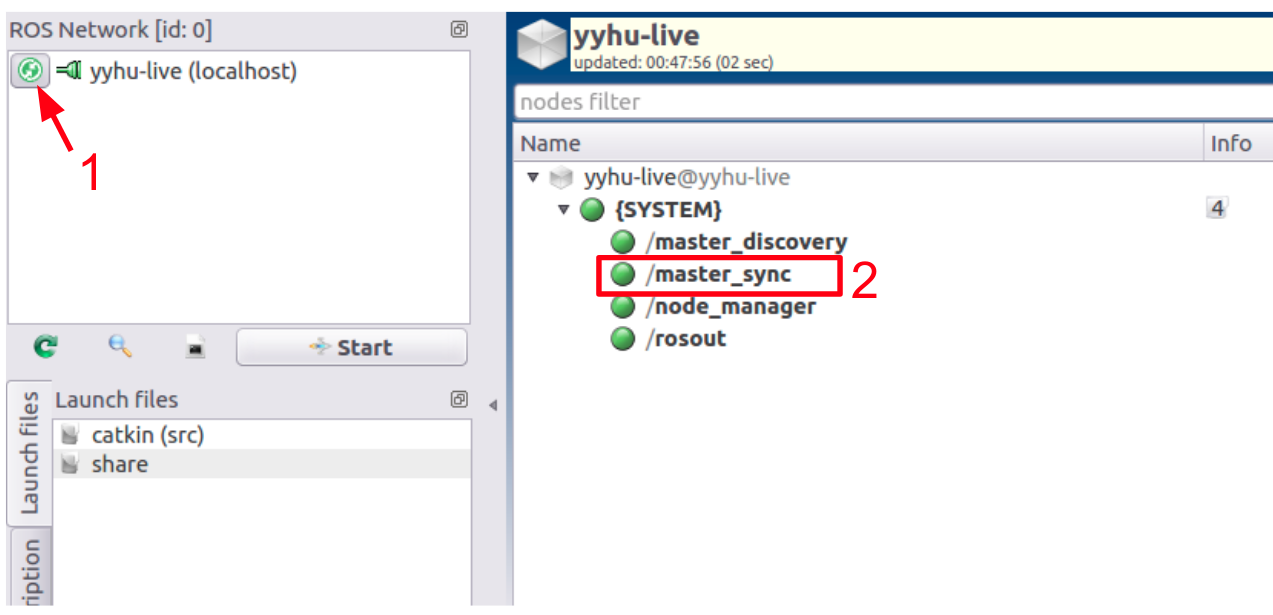
Figure 11 Start master_sync node in the node_manager. ↑
Then this button changes its color and a new master_sync node (#2 in figure 11) is launched.
To let the ROS network discover new client, we have to manually launch the master_discovery node on the client which is C1 for our example. On C1, launch ane new master_discovery node within “screen” and with a different node name. As shown in figure 12, we will see C1’s information.
screen -S _master_discovery_ai -dm rosrun master_discovery_fkie master_discovery _mcast_group:=224.0.0.1 __name:=master_discovery_ai
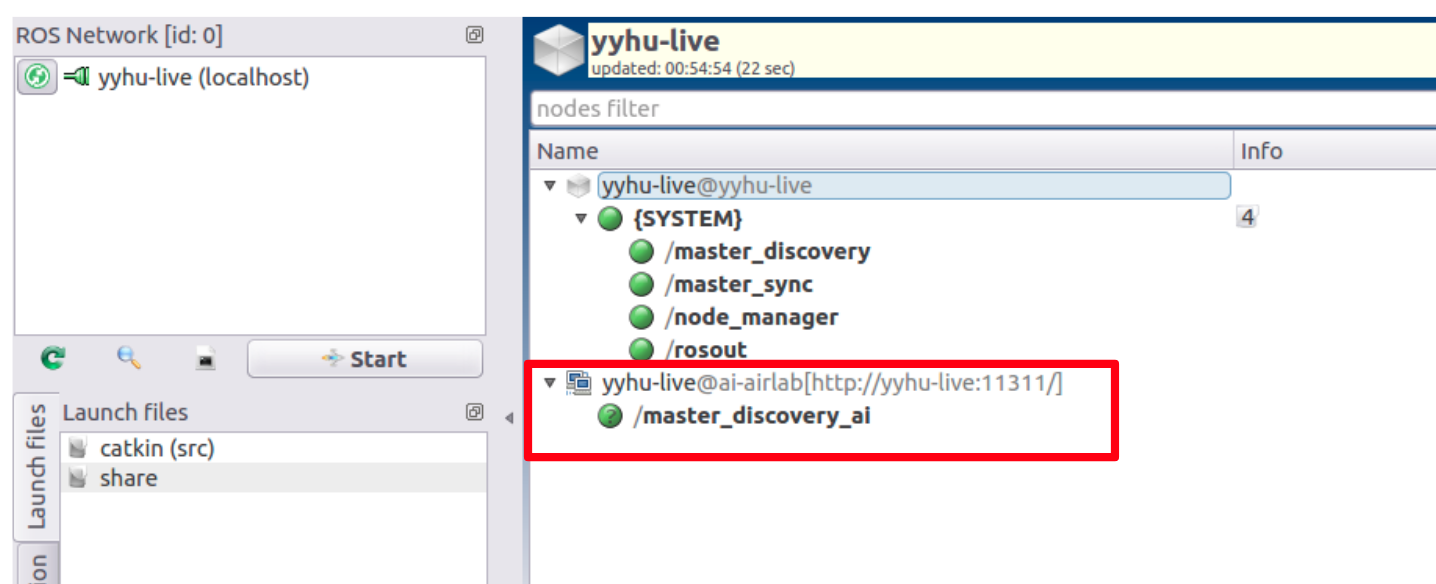
Figure 12 master_discovery node started on the remote client. ↑
If the master_discovery node launched successfully, we could see its information in node_manager.
Now we could launch our sample node on C1 by
screen -S _simple_pub_launch -dm roslaunch test_pub simple_pub.launch
After launching, node_manager on C0 will show its information, as illustrated in figure 13 (#1).

Figure 13 /simple_pub_launch node launched on remote computer. ↑
We could use the tool (#2 in figure 13) provided by node_manager to open an SSH session on C0 to get access to the “screen” which is running on C1. Select any node under “yyhu-live@ai-airlab[http://yyhu-live:11311/]”, click the button (#2 in figure 13) or use the shortcut “F3” to start an SSH session to the “screen” containing that node. A dialog window, figure 14, will pop up to request the username and password for the SSH session. The user may have to input his/her password a second time on the opened SSH session.

Figure 14 SSH login dialog. ↑
Use “Ctrl+a, d” to detach and close this window.
On C1, the user could use
screen -ls
To checkout the list of “screen”s.
On C0, the user could stop the /simple_pub_launch node by clicking the “stop selected service” button (#3 in figure 13) to the left of the GUI of node_manager. Once clicked, the “screen” process on C1 will be killed and command “rosnode list” will show no sign of /simple_pub_launch.
2.3 default_cfg
For now, the user still has to manually launch a ROS node on C1 (in a “screen”) to let the node_manager see and interact with it. In fact, multimaster_fkie provides a method to launch a node in the remote client. This is achieved by the default_cfg node.
default_cfg node expects a launch file. In that launch file, the user list all the nodes that he/she would like to let node_manager on C0 to manage. default_cfg node provides some additional functionalities such as autostart and respawn, delayed start, and conditional start. The user is encouraged to check out the official documentation to learn all the possible functions.
With our test_pub package, we compose a new launch file for default_cfg as shown in figure 15.

Figure 15 The test_pub launch file for default_cfg node. ↑
Note that we configured a delayed autostart for the simple_pub_launch node (the ROS node name we configured in this launch file.) Then we prepare another launch file, shown in figure 16, for launching default_cfg itself (The file name is “default_cfg_test.launch”).

Figure 16 The launch file to launch default_cfg itself. ↑
In this launch file, we enable the autostart function and tells defualt_cfg the information of the node to launch. Then we could launch default_cfg as usual with a “screen”.
screen -S _default_cfg -dm roslaunch default_cfg_fkie default_cfg_test.launch
Then as shown in figure 17 on C0, we could see that there are two new nodes get launched.

Figure 17 defult_cfg launched on remote client. ↑
If we could operate our computer in a prompt fashion (or set a larger delay time for autostarting), we could see that the /simple_pub node gets launched after a requested delay, as configured in the launch file shown in figure 15.
Now, a user could stop or restart a ROS node by clicking the “start selected service” and “stop selected service” buttons (#4 and #3 in figure 13) of node_manager on C0, to control this node remotely.
2.4 Other stuff
To stop the entire ROS network, quit node_manager, and stop roscore, use the red cross button (see figure 18) on the node panel (the larger red cross). Once clicked, the “Close/Stop/Shutdown” dialog will be brought to the front, see figure 19. Choose “stop ROS” to quit the roscore at the same time. Note that, choosing “shutdown host” will turn off the C0 computer.

Figure 18 The larger red cross. ↑
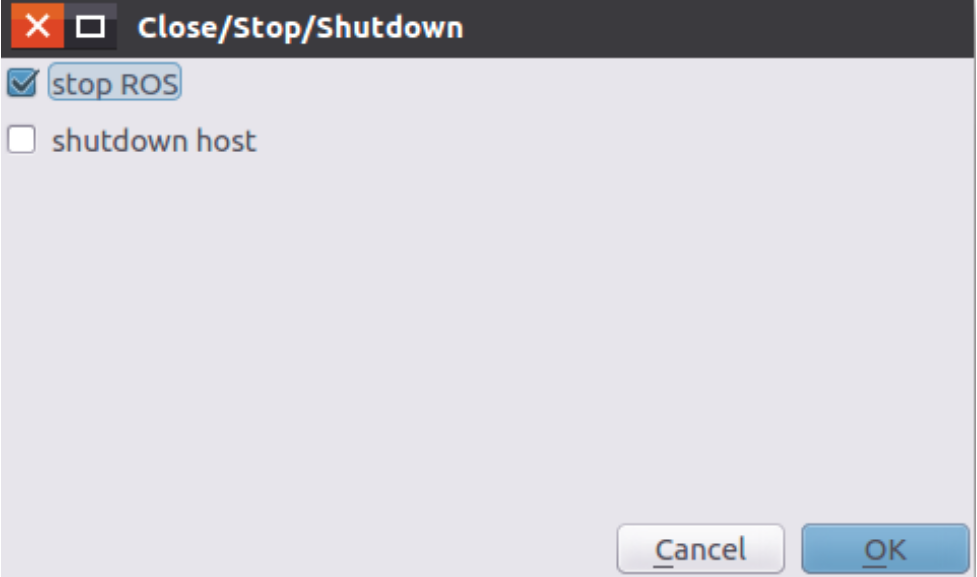
Figure 19 The “Close/Stop/Shutdown” dialog. ↑
Image courtesy: The cover image is copied from the ROS official website.